Effective QSYS Expo Window Design
Estimated reading time: 16 minutes
IBM i DDS WINDOWS
IBM i DDS Keyword WINDOW is a record-level keyword used to specify that the record format you are defining will be displayed using a window.
A DDS WINDOW defines a rectangular area on the grid screen commonly specified by a starting position (upper-left corner of the rectangle), a height (vertically occupying rows), and a width (horizontal columns).
For example, the following fragment of DDS specifies a display record named WINDOW1 with two fields:
     A          R WINDOW1                   WINDOW(4 20 9 30)
     A            FIELD1         8A  B  2 10
     A            FIELD2        10A  B  6 10
WINDOW1 is described as starting in Row 4 Column 20 and ending at Row 9 Column 30. When the WINDOW1 record is displayed, the upper-left corner of the window border is on row 4 column 20 of the display. The lower-right corner of the border is located 10 rows lower than the upper border and 33 columns to the right of the left border.
- Lower border row = upper border row + height (window-rows) + 1
- Right border column = left border column + width (window-columns) + 3
The FIELD1 field is described as being located in Row 2 Column 10 relative to the window, so when displayed, it starts 2 rows lower than the upper border and 11 columns (the ending attribute byte for the border character has been taken into account) to the right of the left border character (row 6, column 31 on the display).
- Actual field row = upper border row + row number of field
- Actual field column = left border column + column of field + 1
The FIELD2 field starts 6 rows lower than the upper border and 11 columns to the right of the left border (row 10, column 31 on the display).
The following image shows the green-screen (terminal) rendering:

The WINDOW frame shown in this picture does not appear in the Terminal screen - given the simple
DDSlisted above -. It is presented here for visualization clarity. The number guides for rows and columns are also not part of the screen output. Applications generate frames, title etc. using character screen attributes and other keywords such as:WDWBORDER,WDWTITLE.
Overlaying Window records
It is very common to use WINDOW records that Overlay on top of other records currently displayed in the Page (See OVERLAY ).
You use this record-level keyword to specify that the record format that you are defining should appear on the display without the entire display being deleted first.
Expo Overlapping WINDOW Anatomy
To describe how the legacy Displayfile rendering is implemented using RazorPage technology, let’s use a real scenario.
This topic assumes you have read Expo DDS-like TagHelpers
An application presents a Page with CUSTOMER MAINTENANCE records, and enables F4 command key to present a WINDOW that overlaps on the page.
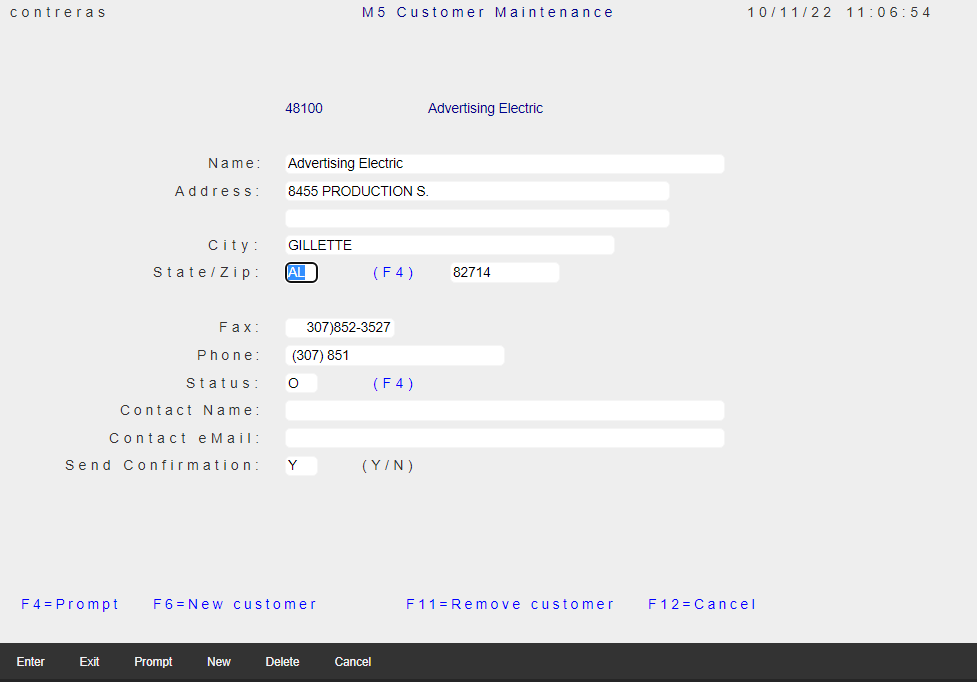
When the cursor is located to the State/Zip: input field, and F4 command key is pressed, the following Page is presented.
The Displayfile for the WINDOW record, is described in a file called AppViews\Pages\CUSTPRMP.cshtml and has the following contents (only a section presented to simplify explanation)
<form id="MonarchForm" method="post">
    <DdsFile DisplayPageModel="Model" KeyNames="F12 'Cancel';" >
        <DdsFunctionKeys Location="HorizontalBottom" />

        <main role="main" class="display-element-uninitialized">
            <DdsRecord For="MYWINDOW" WindowTitle=@Model.MYWINDOW.WINTITLE
                       WindowLeftCol=30 WindowTopRow=9 WindowWidthCols=43 WindowHeightRows=14 >
                @{
                    int SFLC_SubfilePage = 8;
                }
                <DdsSubfileControl For="SFLC"  SubfilePage="@SFLC_SubfilePage" ShowRecordNumber="(int)@Model.SFLC.SFLRRN"
                                   CueCurrentRecord=true ClickSetsCurrentRecord=true>
                    <div Row="2">
                        <DdsConstant Col="2" Text="1=Select" Color="Blue" />
                    </div>
                    <div Row="4">
                        <DdsConstant Col="2" Text="Sel Value Description                     " Color="DarkBlue" Underline="*True" />
                    </div>
                    <div Row="5" RowSpan="@SFLC_SubfilePage">
                        @for (int rrn=0; rrn < Model.SFLC.SFL1.Count; rrn++)
                        {
                            int row = 5 + rrn;
                            <DdsSubfileRecord RecordNumber="rrn" For="SFLC.SFL1">
                                <DdsDecField Col="3" For="SFLC.SFL1[rrn].SFLSEL" VirtualRowCol="@row,3" EditCode="Z" tabIndex=@pageTabIndex++ />
                                <DdsCharField Col="6" For="SFLC.SFL1[rrn].SFLVALUE" />
                                <DdsCharField Col="12" For="SFLC.SFL1[rrn].SFLDESC" />
                            </DdsSubfileRecord>
                        }
                    </div>
                </DdsSubfileControl>
                <div Row="14">
                    <DdsConstant Col="2" Text="F12=Cancel" Color="Blue" />
                </div>
            </DdsRecord>

            <DdsMessagePanel />
        </main>
    </DdsFile>
</form>
As you can see in this Markup listing, only the record MYWINDOW is described, containing the Subfile which will be used to populate with the database records (US Zip codes). Any Previous records shown at runtime on the Page are not described in this Displayfile.
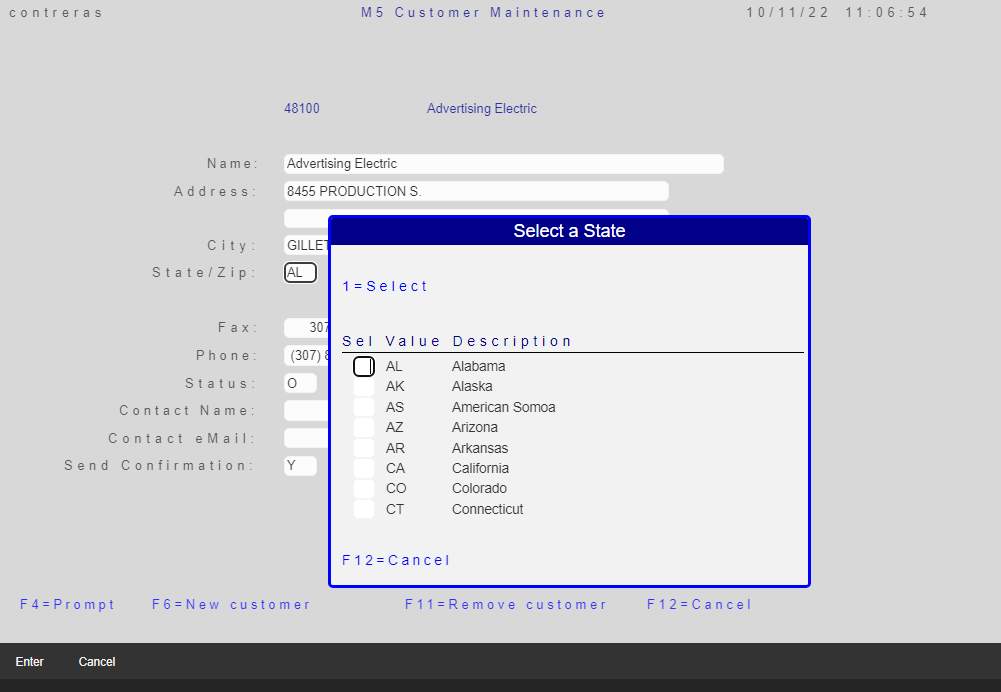
Let’s ignore for a moment how the Previous records will be recovered, and focus on the WINDOW active records. The following page would be rendered.
The Popup Window
With reference to the previous image, you can notice that all records appear now on a Popup Window (once we recover the previous records, the Popup nature will be more obvious).
Microsoft Razor rendering output will initially have the Rows laid out on the “main” DIV. The Expo JavaScript Library has initialization code that will recognize the need to create a DIV that will be used for the Popup Window (with its Title and frame), using the meta-data rendered resulting from the DdsRecord properties WindowLeftCol, WindowTopRow, WindowWidthCols and WindowHeightRows.
Following the example, the following HTML will be injected to the DIV that defines the “Main” Displayfile area:
<div class="dds-window-popup" style="left: 330px; top: 215.75px; width: 477px; height: 367.466px;">
   <div class="dds-window-header">Select a State      </div>
      <div class="dds-window-popup-record-container">

   .
   .
   .

      </div>
    </div>
</div>
The new DIV has in-line style defining the position and dimensions of the Popup Window and the associated CSS describes the rest of the needed style. Of particular importance is the position style, which is indicated as relative to its container element.
.dds-window-popup {
    position: relative;
    display: block;
    overflow: hidden;
    border: var(--popup-border-width) solid var(--popup-background);
    border-radius: 5px;
    text-align: center;
    border-color: blue;
    border-width: medium;
}

.dds-window-popup-record-container {
    background: var(--popup-background);
    width: 100%;
    height:100%;
}

.dds-window-header {
    height: var(--popup-header-height);
    line-height: var(--popup-header-height);
    color: white;
    background-color: darkblue;
    cursor: grab;
    user-select: none;
}
The next step (of the initialization logic) is to move ALL Rows from the the “Main” element to the DIV with class dds-window-popup-record-container.
Since records were moved from the “Main”
DIVto the new Popup Window, the “Main” element does not have a natural height, JavaScript logic sets themin-heightin-line style to produce an empty page. (The size comes from27multiplied by the computed height of a Row)
The Previous record’s Rendering
When a Page is submitted it needs to prepare an image of what is presently on the Page that may become the ‘previous’ page on a subsequent Window display.
Regardless of the fact that an Application may (or may not) use WINDOW records, any Page will Capture and Store its image of the current contents of the “Main” DIV to be used as the background of a subsequent Page with Window records.
ASNA Expo Web Content JavaScript includes a module to convert HTML to png image format. The trigger event when the Capture of the “Main” DIV is converted to an image is just before calling the Form Submit function. The Form Submit function is called, in response to pushing Command action keys (i.e Enter and Function keys), of any button associated with that action.
Storing the Background Image
Web Browsers allow private (client) storage of string items. Web Storage API includes Session Storage, that is transient as long as the Session exists. ASNA Expo Web Content JavaScript makes use of this facility to store Previous record state.
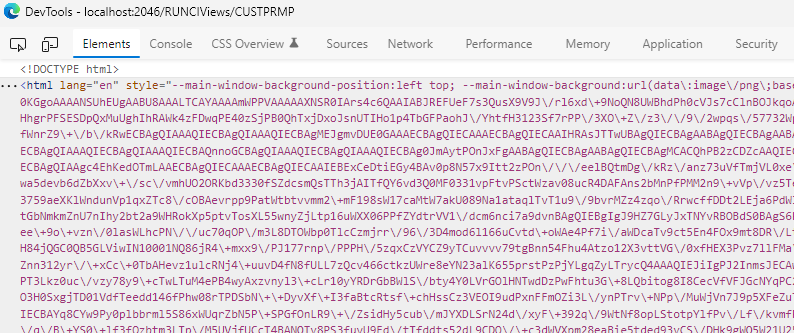
The following Browser’s Development Tools screen-shot, shows what will appear in the Application storage for the example we are presenting here.
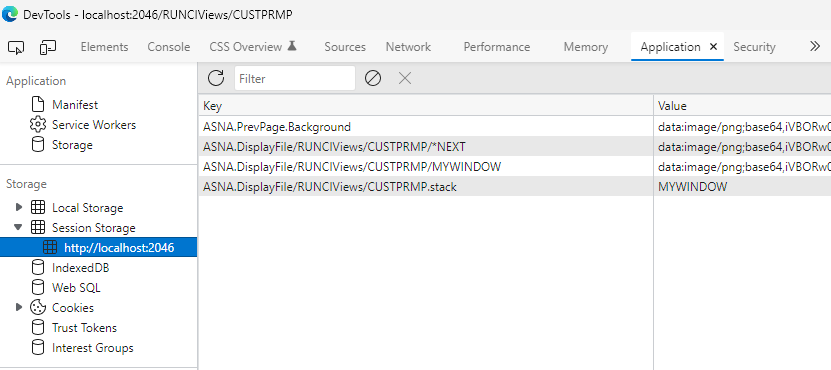
When Submitting (as described before), the “Main” DIV HTML is converted to a png - using the string data:image with the Base64 encoding, replacing any item in the Session with the name ASNA.PrevPage.Background.
Retrieving the Background Image
When a new page that contains a WINDOW is about to be rendered, the Expo initialization logic will look in the Session storage items for the image that will be set as the CSS Background image of the “Main” DIV.
For simplicity, lets assume the image we want is the one stored in item named
ASNA.PrevPage.Background. For more advanced scenarios, where multiple-overlapping WINDOWS are used, a stack of items is used.
Once the proper image is found in the Session Storage, the string data is set to a CSS Variable, as follows:
Let’s peek into the CSS for the “Main” DIV:
.display-element-initialized {
    background-image: var(--main-window-background);
    background-repeat: no-repeat;
    background-size: auto, auto;
    background-attachment: fixed;
    background-position: var(--main-window-background-position);
}
Notice that there are several styles that indicate how this image will be displayed in the background. For the sake of this description, let’s focus on two styles:
    background-image: var(--main-window-background);
    background-position: var(--main-window-background-position);
HTML Elements allow creation of Custom CSS Properties (variables) which are named by the use of prefix --, like:
element {
  --main-bg-color: brown;
}
These values may be later referred to by the use of var keyword in the CSS syntax:
element {
  --main-bg-color: brown;
  background-color: var(--main-bg-color);
}
A more common approach is to collect all these CSS variables and set them at the root element.
:root {
  --main-bg-color: brown;
}
The
rootelement of aHTMLpage is thehtmltag. (The:rootCSS syntax adds these properties to thehtmlelement in a page).
Browser’s Developer Tools, show the initial value of the :root variables at the bottom pf the Style property panel, but when these variables are changed by JavaScript code, their new overridden value appears as in-line properties to the html element (as shown below):
When setting large values (as it is the case for image encoded data), it is unfortunate that the inspection of elements using Developer Tools is obscured.
To make the Inspection of the Elements a good experience, it is highly recommended that you use the Search feature, asking the Inspector to locate the “main” element.

Using this technique, it is possible to move the large image data-value out of the way, and locate the elements inside the Popup Window.
We have talked about the image data and how JavaScript in Expo Library will read it from Session Storage and set the contents as variables to affect the “Main” DIV background.
Now let’s discuss other calculations that happen when is WINDOW is active on a page:
-
During initialization:
a. The image background-position is set to match the “Main”
DIVupper-left position in pixels.b. The size of the background image is computed and set as the width and height styles (in pixels) to define “Main”
DIVdimensions. (Note that the only real element inside “Main”DIVis the Popup Window, which will not expand the “Main”DIVbackground area automatically). -
The DOM’s Window resize event is watched, the document scroll event is watched as well as the “Main”
DIVparent-element’s scroll event is watched. The handling of all of these events is the same: query the new upper-left position of the “Main”DIVand set it as the background-position. This technique produces the effect that the background image follows the Popup Window, as expected.
If “Main”
DIVwidth or height are overridden insite.css, the resize and scrolling of the Page will be affected.
Hooks to User-Defined JavaScript
The process of Storing new Background Images can be affected by User-defined JavaScript code. Each time a new “Main” HTML capture process is performed, the following functions (if defined) are called:
MonarchPageSavingForPopup()- Called right before the HTML to image process is requested.MonarchPageForPopupSaved()- Called right after the HTML to image process completes.
No parameters are passed (the DOM is accessible to User-defined code).
In addition, there is another callback, namely, MonarchWindowBackgroundHtmlToImageFilter(node) which is called for every node in the DOM tree (starting at “Main” DIV). If the callback is implemented, User-defined code has a chance to filter the node (and its descendants) for inclusion. If the function returns false, the node is excluded from the image.
Images that violate CORS will be excluded
When an image on the Page comes from an external site (or some other type of CORS violation), the image will be excluded and the ‘Previous’ page (used by subsequent WINDOW displays), will be incomplete.
You will know which images may be missing, just by looking at your unit-testing Pages. If this is a required image for the Pages with WINDOWS, then you need to bring the resource first to your site and use that image instead.
Overriding WINDOW Styles
We have talked about several important CSS styles that affect the look of Pages with WINDOWS. Your application most likely define its own color Theme and/or additional non-Monarch HTML elements around the Display file “Main” area.
The standard Cascading CSS rules apply.
ASNA Expo Web Content library defines the framework styles in your root page at: ~\wwwroot\lib\asna-expo\css\expo.css
Your own CSS most likely comes from file: ~\wwwroot\css\site.css you can Cascade any of the styles on this file (it is loaded after ASNA Expo Web Content own CSS)
If you want to override the styles that the framework defines as computed from CSS variables (as explained in this topic), you can still override the setting with your hard-coded style in ~\wwwroot\css\site.css
For more advanced customization, the CSS variables are accessible from your user-defined JavaScript.
Popup WINDOW Drag/Drop
Popup WINDOW Header is draggable, when hovering the mouse pointer over the Window Popup header you will notice that the mouse pointer changes to a Drag icon hand (checkout dds-window-header class above). Dragging the Popup Window works as expected: the Window is re-positioned on its background Page.
When the WINDOW is displayed again (the record is re-executed by the Application logic), the new Window position is lost, and the position defined by the Razor Page overrides any Window Dragging performed.
This is may be particularly confusing when using multiple overlapping windows.
Of minor importance - but worth noticing - the Window Title (being part of the draggable element), cannot be selected to be used for Copy/Paste.