Guide to Printer Writer Configuration
Estimated reading time: 6 minutes
Monarch provides the program ASNA.QSys.PrinterWriter.exe to assist in the processing of spooled printouts (Manuscripts) waiting in an output queue.
A Printer Writer ‘watches’ an output queue directory, selects a manuscript out of the queue and invokes a Renderer to produce the report in the manuscript on a printer.
ASNA.QSys.PrinterWriter.exe can be run as a standalone program or be set as a Windows Service.
You can read the Concepts behind printing here.
Configuration Settings
The PrinterWriter’s appsettings.json file is used to provide the default configuration for the writer. Command line arguments override those in the JSON file.
The configuration settings are:
| Setting | Usage |
|---|---|
| OutputQueueRootPath | The path to the root folder of the output queue’s subfolders. This should be the same as the JobConfig.OutputQueueRootPath property used to instantiate the application’s jobs. |
| OutputQueueName | The output queue’s name. The combination of the OutputQueueRootPath and OutputQueueName form the folder path where manuscripts will be expected. Each instance of PrinterWriter can only process manuscripts from a single queue. |
| PrinterName | The name of the printer where all output should be forced to. If not given, the printer’s name in each manuscript will be used. |
| TextOnly | Set to true to direct the Printer Writer to ignore all graphical settings and print only the output text. |
| DataGateRendererPath | The location and name of DataGate’s renderer. Typically set to: C:/Program Files (x86)/Common Files/ASNA Shared/Client/Common/Renderer.exe. |
Assume the following setup on a Windows machine:
| Item | Location |
|---|---|
| Output Queue Root | C:/MonarchQueues/OutputQueues |
| Printer Writer Exe | C:/MonarchOperations/bin/ASNA.QSys.PrinterWriter.exe |
AppSettings
Given the locations above, the PrinterWriter’s appsettings.json could be configured as follows:
{
   . . .

    "AppSettings": {
        "OutputQueueRootPath": "C:/MonarchQueues/OutputQueues",
        "DataGateRendererPath": "C:/Program Files (x86)/Common Files/ASNA Shared/Client/Common/Renderer.exe",
        "OutputQueueName": "QPRINT"
    }
}
In addition to the settings above, the PrinterName can be used to force all output to go to a particular printer and the TextOnly bypasses the DataGate Renderer and prints using text only without any graphical components.
The only printers that can be used by PrinterWriter are those those visible to the user account. This is particularly important when running the PrinterWriter as a Service (see below).
Here is an example that forces output to the front office printer in text only mode.
{
   . . .

    "AppSettings": {
        "OutputQueueRootPath": "C:/MonarchQueues/OutputQueues",
        "DataGateRendererPath": "C:/Program Files (x86)/Common Files/ASNA Shared/Client/Common/Renderer.exe",
        "OutputQueueName": "QPRINT",
        "PrinterName": "\\\\FrontOfficeServer\\Brother MFC-L9570",
        "TextOnly": true
    }
}
The OutputQueueName in the appsetings.json file is the default queue name for the PrinterWriter. Each instance of PrinterWriter can only process manuscripts from a single output queue. If multiple queues are used by the application, an instance of PrinterWriter should be launched for each queue providing the queue’s name to each instance with a command line parameter.
Command Line Parameters
Command line arguments can be given when invoking the writer to override those settings found in the appsettings.json file.
The format of the parameters is the standard one for .NET configured applications. One such style is prefixing each parameter with two dashes --. For example, to override the output queue name and the output queue root path, use:
--AppSettings:OutputQueueRootPath="C:/Print Output/Queues" --AppSettings:OutputQueueName MyOutputQueName
Install PrinterWriter as a Windows Service
Create EventLog First
When PrinterWriter runs as a Console program it logs its messages directly to the Console’ window but when PrinterWriter runs a Windows Service, its logging facilities are directed to a Windows Event Log. Therefore, it is necessary to create an EventLog before creating the Windows Service.
You can use PowerShell, running as Administrator, to create the EventLog. In PowerShell enter New-EventLog to create the log ‘interactively’. Enter ASNA QSys PrinterWriter for the LogName and enter one Source called PrinterWriter as follows:
PS> New-EventLog
cmdlet New-EventLog at command pipeline position 1
Supply values for the following parameters:
LogName: ASNA QSys PrinterWriter
Source[0]: PrinterWriter
Source[1]:
If you ever need to delete the EventLog you can issue this command in PowerShell
PS> Remove-EventLog -LogName "ASNA Qsys PrinterWriter"
Create the Service
To Create and Delete the PrinterWriter as a Windows Service, use the sc program in a Command Prompt running as Administrator.
Use the sc create to installing a PrinterWriter
For the assumptions above, here is an example of Creating/Installing the writer for the Invoices output queue:
> sc create "ASNA PrinterWriter Invoices" binpath= "C:/MonarchOperations/bin/ASNA.QSys.PrinterWriter.exe  --AppSettings:OutputQueueName Invoices"

> sc description "ASNA PrinterWriter Invoices" "This services sends Invoices in an Output Queue to a Printer"
To Delete/Uninstall the Writer Service issue this command
> sc delete "ASNA PrinterWriter Invoices"
Manage the PrinterWriter
The sc program allows further control of the Service with commands to Start, Stop and Pause the PrinterWriter.
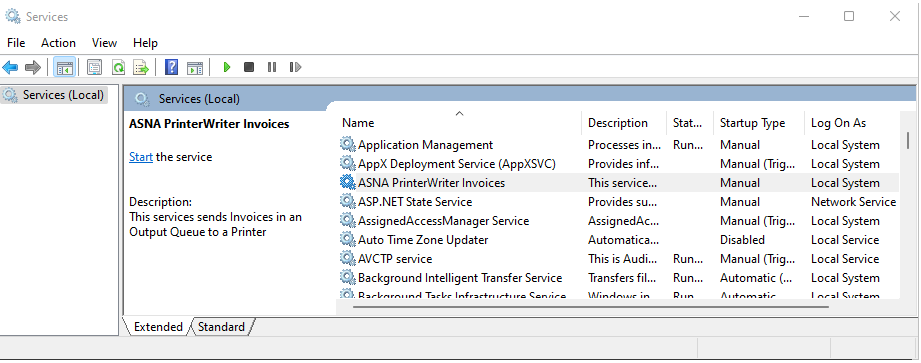
You can also use the Services plugin on the Management Console to interactively manage the PrinterWriter.
 Services Applet in MMC
When running the PrinterWriter as a Service (see below), the only printers available to the Service are those visible to the user account running the Service. If it is being run under the local system account, then the only visible printers are those installed locally, not network printers.
Install Printer for ‘All Users’ on Windows
To add a printer on a computer basis, i.e.: available to all users, use the printui.dll utility
The process is as follows:
- Run the command prompt as an Administrator
- Type
rundll32 printui.dll,PrintUIEntry /ga /n\\server\printerwhere server and printer make up the correct UNC path to the printer. - Restart the spooler service with the commands:
net stop spoolernet start spooler
The printer should now be listed and available to all users that log onto the workstation.